HD24/Adat Remote Control
Software
HD24
ADAT
This program works with tape adats as well, provided you have a method of getting the commands into the adat.
KEYBOARD COMMANDS
Numbers 0..9: track arming and time code entry keys.
Type 3 to arm track 3, type 3 again to safe
1-2 to arm track 12, and so on.
0-0 will safe all tracks,
9-9 will arm all tracks.
0-1..9 will enter time code, press stop to leave time code entry and locate
(actually, any key other than a number will do it)
/ : Rewind
* :Stop
- : Fast Forward
+ : Play
.-. : Record (that's a period-period)
The idea is to do all of the commands on the 10 key pad. So a separate 10 key pad with a long cord would allow you to get away from the computer. It also makes sense when used with an infrared remote.
A word about the configuration modes:
And for the brave: there's a way to use an infrared remote to control your recorder
Known Issues:
1. The HD24 won't do remote FF or RW!?! So this program simulates it. But
there's no way of knowing where the end of the song is, so it will try to FF
past the end of the song until the HD24 reports "out of range".
Sigh... DON'T use RW or FF in HD24 mode if you have a tape machine sync'd after
the HD24. The tape transport hunts like crazy.
2. The HD24 doesn't send record arm notifications, so this program can't know if
you push a record arm button on the front panel.
Hardware
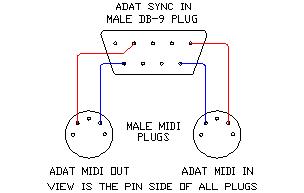
The Adat sync port contains midi in and midi out signals that are designed to provide for control of the adat, either by another adat or BRC for example. The cabling to wire an adat directly to a midi interface is quite simple.
The wiring above will enable sequencers to send Midi Machine Codes (Stop, Play, RW, FF, Locate to, etc.) to the adat. Note that this wiring is NOT sanctioned by Alesis, but it works fine.
Adat's in a chain configure themselves in sequential order, with the master adat having a machine id of 00, next in line 01.... For transport controls, you can set the machine id to "all" or 7F.
Fixes
-Added some space around the record button, required a double
click to enter record.